You can find more information about the ConnectionConsumer/ConnectionProvider classes here:
Provider Class:
http://msdn.microsoft.com/en-us/library/system.web.ui.webcontrols.webparts.connectionproviderattribute.aspx
Consumer Class:
http://msdn.microsoft.com/en-us/library/system.web.ui.webcontrols.webparts.connectionconsumerattribute.aspx
This example is using Visual Studio 2010, which creates Visual Webparts in a different manner to Visual Studio 2012.
1. Create a new Empty SharePoint project using Visual Studio 2010 (Deploy as a Farm Solution)
2. Add two new visual webparts to the project, one called Provider and the other called Consumer

3. Add markup to the Provider webpart's user control (ProviderUserControl.ascx) for entering a user name (this will be the data passed to connected webparts)
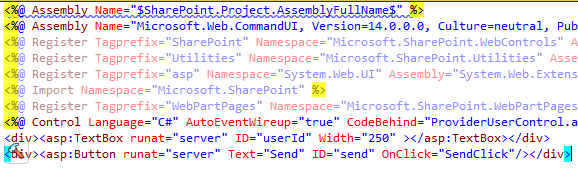
<div><asp:TextBox runat="server" ID="userId" Width="250" ></asp:TextBox></div>
<div><asp:Button runat="server" Text="Send" ID="send" OnClick="SendClick"/></div>
4. Now add code to the webpart class file, Provider.cs, to implement the provider interface.
a). First, create a new interface in the ConnectedWebparts namespace.
public interface IUser
{
    string UserId
    {
        get;
        set;
    }
}
b). Second, set the webpart's class to implement the interface, and then implement the interfaces single member, marking it with the ConnectionProvider attribute.
public class Provider : WebPart, IUser
{
    // Visual Studio might automatically update this path when you change the Visual Web Part project item.
    private const string _ascxPath = @"~/_CONTROLTEMPLATES/ConnectingWebparts/Provider/ProviderUserControl.ascx";

    protected override void CreateChildControls()
    {
        Control control = Page.LoadControl(_ascxPath);
        Controls.Add(control);
    }

    public string userId;
    public string UserId
    {
        get { return userId; }
        set { userId = value; }
    }

    [ConnectionProvider("User ID")]
    public IUser Users()
    {
        return this;
    }
}
c). The whole file should look like this:using System;
using System.ComponentModel;
using System.Web;
using System.Web.UI;
using System.Web.UI.WebControls;
using System.Web.UI.WebControls.WebParts;
using Microsoft.SharePoint;
using Microsoft.SharePoint.WebControls;
namespace ConnectingWebparts.Provider
{
[ToolboxItemAttribute(false)]
public class Provider : WebPart, IUser
{
// Visual Studio might automatically update this path when you change the Visual Web Part project item.
private const string _ascxPath = @"~/_CONTROLTEMPLATES/ConnectingWebparts/Provider/ProviderUserControl.ascx";
protected override void CreateChildControls()
{
Control control = Page.LoadControl(_ascxPath);
Controls.Add(control);
}
public string userId;
public string UserId
{
get { return userId; }
set { userId = value; }
}
[ConnectionProvider("User ID")]
public IUser Users()
{
return this;
}
}
public interface IUser
{
string UserId
{
get;
set;
}
}
}
5. Next, add code to the Providers user control (ProviderUserControl.ascx.cs) that will set the IUser userid property on the webpart in the button click event.
namespace ConnectingWebparts.Provider
{
    public partial class ProviderUserControl : UserControl
    {
        protected void Page_Load(object sender, EventArgs e)
        {
        }
        protected void SendClick(object sender, EventArgs e)
        {
            if (!String.IsNullOrEmpty(userId.Text))
            {
                var parentControl = (Provider)Parent;
                parentControl.UserId = userId.Text;
            }
        }
    }
}
6. In the consumer webparts user control (ConsumerUserControl.ascx), add the markup for displaying the value passed to the webpart by the provider

<div><asp:Label runat="server" ID="displayUser"></asp:Label></div>
8. Add a property to the webparts class file (Consumer.cs) for receiving the property passed from the provider webpart. This property will be of type IUser and marked with the ConnectionConsumer attribute.
namespace ConnectingWebparts.Consumer
{
    using ConnectingWebparts.Provider;
    [ToolboxItemAttribute(false)]
    public class Consumer : WebPart
    {
        private const string _ascxPath = @"~/_CONTROLTEMPLATES/ConnectingWebparts/Consumer/ConsumerUserControl.ascx";

        protected override void CreateChildControls()
        {
            Control control = Page.LoadControl(_ascxPath);
            Controls.Add(control);
        }

        public IUser _users;
        [ConnectionConsumer("User Id")]
        public void GetUserId(IUser users)
        {
            if (users != null)
            {
                _users = users;
            }
        }
    }
}
9. Lastly, add code to the consumer user control (ConsumerUserControl.ascx.cs) for getting the IUser property (from the parent webpart) and displaying it.
namespace ConnectingWebparts.Consumer
{
    public partial class ConsumerUserControl : UserControl
    {
        protected void Page_Load(object sender, EventArgs e)
        {
        }

        protected override void OnPreRender(EventArgs e)
        {
            base.OnPreRender(e);
            try
            {
                var parentControl = (Consumer)Parent;
                if (parentControl._users != null)
                {
                    displayUser.Text = String.Format("The selected user is: {0}", parentControl._users.UserId);
                }
            }
            catch (Exception exception)
            {
                displayUser.Text = String.Format("An error occurred: {0}", exception.Message);
            }
        }

    }
}
10. Build the project, add both webparts to a webpart page, and connect them together.
a). Connect the webparts

b). No points for good looks!
No comments:
Post a Comment